In this post we focus on the electrical network in our Spanish apartment
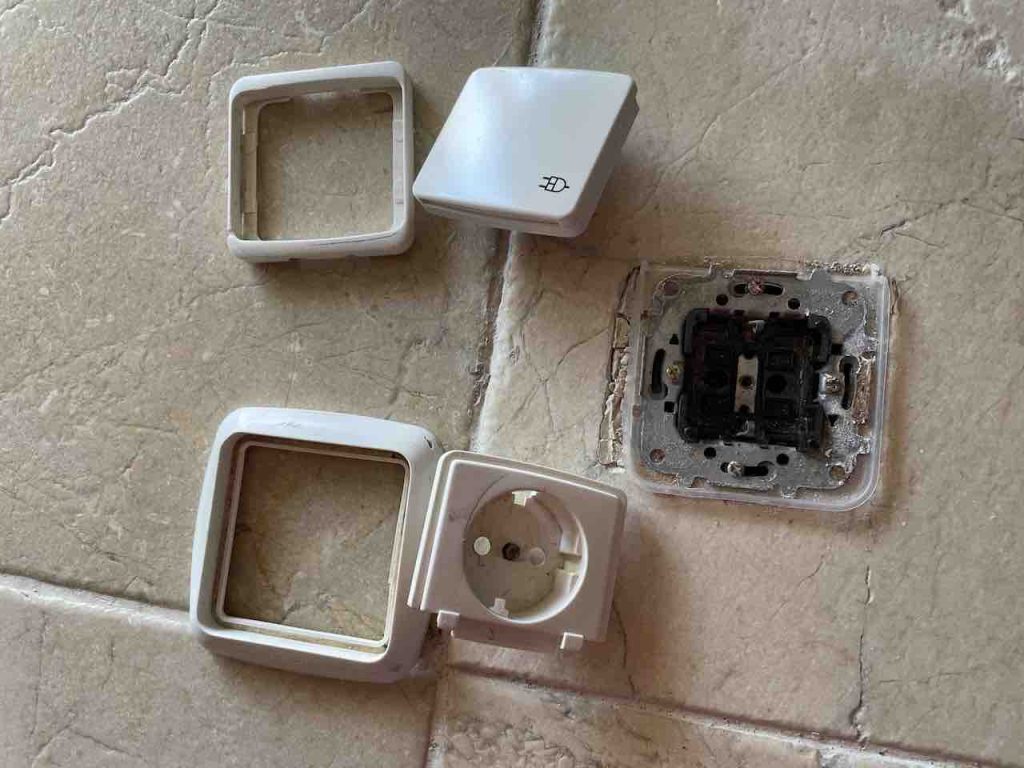
My decision to look more carefully at the electrical system in our Spanish apartment was made when we were decorating. We removed all the face plates of light switches and sockets, and to do that we had to dismount the sockets and switch components.
In doing so we discovered a couple of broken frames, one damaged socket plate, and two poorly mounted sockets, with one that did not work. In addition, we also found two damaged cable covers. In the living room there was a floor socket that is not used, but was regularly hit during vacuuming, etc., and had lost its cover.
Finally we also discovered a potentially dangerous socket installation in our guest bedroom, and we will review this at the end of this post.
It’s also good to keep in mind any changes or additions that were made to the ‘standard’ house or apartment installation. In our case this includes:-
- Professionally installed 24 hr external ventilator in the basement store room, and the addition of a second florescent tube (plus separate switches for lights and ventilator).
- Professionally installed electric awning on the main terrace.
- I added a second light and additional sockets on our covered back terrace.
- Installation of a lockable power supply in our underground parking place. It was professionally installed on our mains supply, so it will support any type of fast-charging station for electric cars.
- We had a number of problems with sockets placed on the terrace and exposed to rain, despite them being protected external sockets. These have been condemned by a local electrician.
Sensible advice
The best advice when working on a domestic electric system is to shut off the main circuit breaker to the entire house or apartment, rather than just the fuse to a specific circuit. Second, always test everything using a multi-meter to ensure that no part is live.
The home electrics we see around us
The visible parts of a homes electrical system are likely to be either functional parts or decorative parts.
There can be as many as 60 different functional options, everything from simple light switches and sockets, through to movement detectors and battery powered transmitters that can be used for switching and/or dimming lighting, or controlling blinds, etc.
These components are usually mounted on galvanised metal frames resistant to oxidation, and usually having rounded corners. There are strict standards that apply to electric components concerning both electrical conductivity and resistance to oxidation and damage by external agents.
Once the functional parts have been installed, wired up, and tested, they are then covered with a plastic protection. A protection that we perceive as light switches and the sockets we use to plug-in computers or bedside lamps, etc.
Covers and cover frames can have a wide variety of shapes and colours, and will normally be made of an insulating resin material with a high dielectric strength and be able to still work in a safe way even under extreme conditions.
In addition you should find one or more fuse boxes (which should contain circuit breakers), and you might also find wall-mounted thermostats for any installed heating, and controllers for any air-conditioning. You may also have an alarm system installed, a fibre-box for the Internet connection, and possibly a video door-phone connection to you buildings main entrance.
Finally it’s worth noting that much will depend on the original date of construction of the house or apartment. Installation regulations and practices change with time, as does built quality and the professionalism of electricians, etc. You may also find ad-hoc electrical installations made by previous owners.
In Spanish we are looking at here:-
- Funciones – interruptores, commutadores, enchufes, tomas de TV o teléfono, etc.
- Marcos – individuales, dobles, triples y cuádruples, en multitud de colores.
As an example, in the wall you have a ‘caja superficie 1 ventana‘, or ‘2 ventanas‘, or ‘3 ventanas‘, which are junction boxes embedded flush with the surface of the wall. On these junction boxes you can fix one or more ‘bastidor sin garras‘ (so they would be screwed to the caja or junction box). The bastidor can hold a ‘mecanismo con tapa‘ (a switch insert with its cover) or a enchufe schuko (a socket). These are the two principle examples, but there are 100’s of different ‘mecanismos‘, that can all be fixed to a bastidor.
On this a ‘marco‘ or frame is push-fixed into the bastidor. In most cases it’s possible to buy the ‘mecanismo‘ pre-fixed to a bastidor, with or without a tapa, which can be fixed separately.
There also exists ‘bastidores con garras‘, which are support plates with separate claws that will hold the plate (and attached switch or plug) to the sides of the junction box set in the wall.
You also have ‘marcos embellecedores‘ (embellished frames) and even ‘marcos flotantes‘ (when they stand-out from and are not flush with the wall).
Make an inventory of home electric components
The first thing to do is to make a list of all the visible electrical components around the home or apartment, for example, light switches, sockets, etc. In our case this included:-
- Hall – a double socket, 3 light switches, and door bell
- Night corridor – a double socket, 3 light switches, and light switch for access corridor in the master bedroom
- ‘Powder room’ – a double socket, 2 light switches for separate lighting, one including the ceiling ventilator
- Living – 5 double sockets, 2 light switches (plus switch for terrace lighting), a triple panel for TV and hi-fi with 4 hi-fi wall outlets, a double panel for telephone and Internet, and the floor socket has a separate ‘light’ switch
- Kitchen – 2 double sockets, plus separate sockets behind oven, microwave, dishwasher and fridge, a triple panel for TV and double for the telephone, 2 light switches, plus a light switch for the back terrace
- Kitchen utility room – 1 light switch, 1 socket, plus separate sockets for washing machine and dryer
- Heating utility room – 1 light switch, 1 socket
- Master bedroom access corridor – 1 double socket, plus light switch in walk-in wardrobe (no sockets)
- Master bedroom – 1 single socket, 1 triple socket, 3 double sockets, two double light switches (including switch for terrace lighting) and a triple light switch set with switches linked to sockets for bedside lighting, and a triple panel for TV
- Master bathroom – 1 double socket, 2 light switches separate lighting, one including the ceiling ventilator
- Guest bedroom access corridor – 2 light switches for one light
- Guest bedroom – 1 single socket, 1 triple socket, 3 double sockets, two double light switches and a triple light switch set with switches linked to sockets for bedside lighting, and a triple panel for TV
- Guest bathroom – 1 double socket, 2 light switches for separate lighting, one including the ceiling ventilator
- Main terrace – 6 double sockets (2 condemned), no light switches but 4 wall lights and a ceiling light, and a triple panel for TV
- Back terrace – 2 sockets added by me.
It’s important to learn the different types of light switches that may be installed in a house or apartment. The Wikipedia article on multiway switching tells us that a simple light switch is in fact single pole, single throw (SPST) switch (interruptores in Spanish).
Multiway switching (commutadores in Spanish) is the interconnection of two or more electrical switches to control an electrical load from more than one location. A common application is in lighting, where it allows the control of lamps from multiple locations, for example in a hallway, stairwell, or large room.
Multiway switching uses switches with one or more additional contacts and two or more wires are run between the switches. When the load (e.g. central room light) is controlled from only two points, single pole, double throw (SPDT) switches are used. Double pole, double throw (DPDT) switches allow control from three or more locations.
Extend the inventory to all useful components
With the inventory made, it’s time to add component codes to all the different items. For this it’s important to start to understand the exact name of each component.
Switches and sockets are usually mounted in plastic junction boxes (jbox) also called recessed conduit boxes which are integrated into the walls, and designed to house electric connections. Electric cables will enter and leave the boxes through protective conduit.
Next comes the outlet or switch which is usually presented as an ‘insert’ permanently mounted on a ‘outlet’ or ‘mounting plate’ which is specifically designed to screw into the recessed junction box. The power outlet (or socket) and a light switch are just two of a multitude of different mechanisms that can be installed, e.g. rotatory dimmers to USB chargers to motion detectors, etc.
The visible part of a switch consists of a rocker switch and a cover frame, and a socket consists of an outlet and cover frame.
The most important element was to identify the two alternative switch models, i.e. the ‘interruptore‘ and the ‘commutadore‘. The first is a simple on-off switch that controls a single lighting circuit, the second is a switch (often called a two-way switch) that can operate in parallel, that is a lighting circuit that is controlled by more than one wall switch (often called a staircase wiring). This is a switch which can switch on and off a light, independently of the on-off position of another switch that also controls the same light (e.g. top and bottom of a staircase).
Maker, model, colour,... and sourcing components
It was simple to determine that all the switches, sockets, etc. were made by a Spanish company called Niessan (which I think is now owned by ABB). However, it took a little bit more effort to determine that the model was ARCO, and colour ‘bianco alpino‘.
This model is no longer made.
The first step was to try to source the few pieces that were broken or needed replacing.
My starting point was searching Amazon in Germany, UK, France and Spain for any Niessen products, then any ARCO pieces, and then any ‘bianco alpino‘ components. It proved possible to source the frames, but more problematic for cable covers, etc.
Given the difficulty in sourcing a simple thing like a cable cover, I decided to make a list of the all the components, and find one or more example as a reserve.
The main problems encountered were:-
- Incorrect or unclear descriptions and images corresponding to piece numbers
- Different descriptive names in different countries
- Parasite results which simple were not Niessen, or did not offer Niessen components, but did offer alternatives
- Non-availability of components that were otherwise correctly described and indexed on a site (finally finding an ‘out of stock’)
- Getting the right piece, but then realising that it did not include the plastic socket or the switch rocker cover (and no indication as to how to find the missing parts)
- Finally receiving a piece that looked identical but wasn’t.
Floor socket - an example
Above we see the floor socket, with the broken socket. I was able to find a replacement socket cover. However, we can see that the frame is actually made of two pieces, that I was able to identify but not find in the catalogues of suppliers holding replacement pieces. I will probably have to replace the entire floor socket, frames and cover with an alternative model. But for the moment the socket works and is safe with the cover.
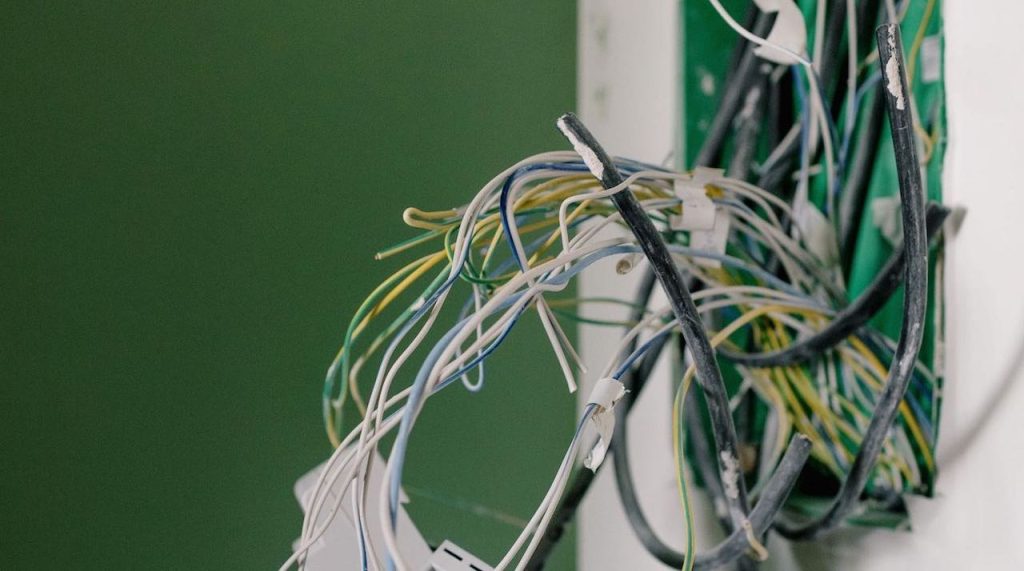
Potentially dangerous sockets
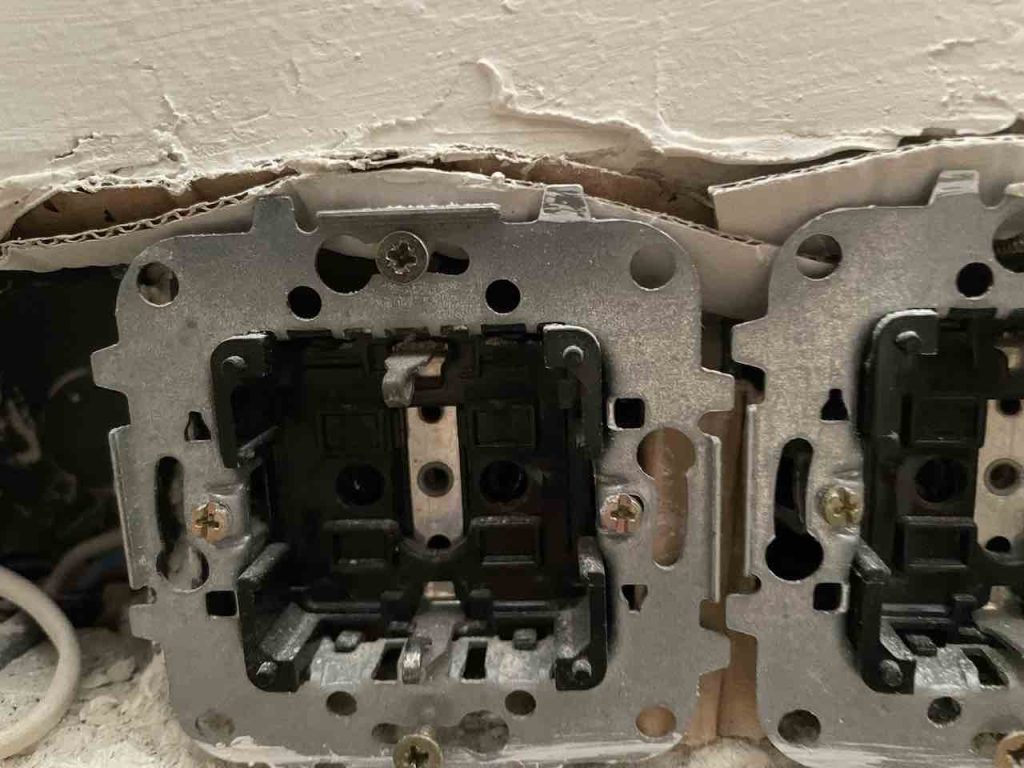
What we see is that the plastic junction box had been badly fitted into the wall. Which meant that it was impossible to fit the socket plates properly. The idiot who made the installation used plates with claws, and just stuffed pieces of cardboard into the spaces to force the plates into more or less the right position for the sockets and frame. This is potentially dangerous because a short could start a fire with the cardboard.
In addition he could not actually screw in the socket insert into the middle socket, so he just left it sitting free, so the socket could not actually be used.
I dismounted the entire set of sockets, rebuilt the support and refitted the sockets correctly. We can see for example that the socket plates should interlock and fit exactly side-by-side (which they don’t in the above photo).