The above photo is not my desktop, but I am constantly fighting to stop my desk ending up looking like this one. Yet I’m sure each thing on the desk has its importance, but taken all together it looks at best cluttered, at worst, a mess.
Looking back, I seem to have almost always sat in front of computer screens, both at work and at home. At home I was quick to adopted the home-built personal computer tower with the CRT monitor. But then I migrated to a ‘luggable‘, before finally adopting the laptop. My first laptop was the almost perfect Sony Vaio, but in the early-mid 2000s I moved from MS-DOS to the PowerBook/MacBook and the Apple ecosystem with macOS.
I retired in 2007, and my wife and I lived across three different homes in three different countries, with quite different cultures. I would move from one place to the other with my laptop and its external drives. In each place I would have a temporary desktop setup each with a different monitor, printer, router, wireless network, etc.
Now alone in life I’ve decided to try (I say try) to finally configure my ideal home desktop setup. Of course, I didn’t really know what that might be, or even what it could be. I had become accustomed to camping on a dining table or using a temporary trestle table in a spare room, and running portable multi-sockets extensions everywhere.
Before starting I needed some guiding principles, namely:-
- The issue isn’t space, it’s too much stuff
- Having too much stuff on a desk makes it difficult to focus
- Keep the essentials (e.g. monitor, keyboard, mouse, etc.), and put all the office supplies in a drawer
- Also keep the digital desktop on the laptop neat and tidy
- Use disinfectant wipes to clean the desk at lease once per week, and also keep the keyboard and screen clean of dust, etc.
There was a counter argument, that disorderly environments encourage the breaking of tradition and convention, and might even help people come up with more interesting and creative ideas.
What emerged was that a persons desktop might be a mirror of their character, but it will certainly affect them in some way.
What Work Surface?
It’s not that surprising that the best place to start building my ideal home desktop setup, was with the desk itself.
Moving from an ad-hoc ‘desk’ setup, meant deciding on a permanent place for my workspace. I was lucky that in one home, a major redecoration freed up some space. And in another home, I would be downsizing to a new apartment, so I had a blank canvas. Finally I could custom build permanent workspaces which would (hopefully) last me to the end-of-time (my time that is).
But what space was I already using? Generally I was able to find a ad-hoc table top space of about 140×100 cm. But a non-negligible part of that space was rendered almost unusable by the monitor and its stand, and my open laptop. Not to mention all the cables, etc.
One of the first decisions I made was to design around two separate workspaces, in each home. One desk-space centred on the computer, with its monitor screen, etc., along with a separate desk-space where I could layout stuff, without have to fit it around a screen, keyboard, mouse, etc.
Looking at the ad-hoc space I was actually using, it boiled down to two ‘half-spaces’, left and right of my keyboard-screen setup, and each about 50x50 cm.
So a computer-desktop surface of between 120×60 cm to 140×70 cm appeared feasible in both homes. And I could then start to imagine creating a separate ‘non-computer’ workspace.
How Best to Optimise the Work Surface Available?
What to do about the desktop space highjacked by the monitor, my open laptop, and all the cables, etc.?
Firstly, I could use a monitor stand to free up the desk space, and bring the monitor to eye-level.
Secondly, hidden power sockets and a cable tray could help remove cables from the desktop. I could also reduce the power cables used, by linking the laptop to the monitor with a USB-C or Thunderbolt cable, and installing a docking station.
Thirdly, I could leave my MacBook Pro closed in a vertical stand, and use a wireless keyboard and mouse.
I’m not sure the ‘clean desk’ seen below is my target, because it does not look ‘lived in’. But it’s a nice idea, only I wonder where the computer is, and what happened to the cables?

It’s evident that sitting at a dining table is not ergonomically optimal. I’m usually hunching over because the table is too low, and I’m having to lean forward because the laptop and even the monitor are not at eye-level. They say this leads to “tech neck” or cervical spine stress.
Also my arms are not supported with proper armrests, causing shoulder and wrist tension. My wrists or elbows rest on the edge of the table or the edge of the laptop, which increases the risk of carpal tunnel syndrome.
I’m slouched in an uncomfortable seat, which can lead to back pain. And my legs are not properly positioned (no feet flat on the ground, knees at a 90-degree angle).
Frankly, I’m surprise I’m still alive!
There are many ideas about how to improve things, but they all boil down to three suggestions, namely:-
- to raise the desk surface and raise the monitor to eye-level
- get a decent chair
- and find a way to reduce all the cables.
What is a 'Standing Desk'?
One, often repeated, option was to go for an electrically adjustable desk, sometimes called a high-adjustable or ‘sit-stand’ desk.
But let’s first look at the simple ‘standing desk‘ which is not adjustable, but an alternative to a ‘sitting desk’.
The principle argument for a ‘standing desk’ is that it improves posture and can reduce neck and back pain. Some experts suggest that because standing is thought to increase blood flow and oxygen levels, this improves concentration, and will make the person more productive. It’s also suggested that it will even lower the risk of obesity, diabetes, and cardiovascular disease.
On the downside prolonged standing can cause pain and potentially lead to health problems such as varicose veins and joint issues from overloading. In addition, the reality is that some tasks are easier to do sitting.
And of course standing doesn’t replace exercise. We know that too much sitting is a health risk, but too much standing actually turns out to be just as problematic. The argument is that when we stand we adopt a position that, like sitting, turns off most of the postural muscles. Which explains why there’s almost no increase in the metabolic rate when moving from sitting to standing.
What is Good Posture?
Ergonomics provides the guidelines and setup adjustments necessary to promote a healthy posture, e.g. reducing strain on the body and preventing discomfort or injury. So our aim is good posture, standing or sitting.
What we know is that a well-designed ergonomic workstation encourages a neutral spine position, reducing stress on the back, neck, and shoulders. We also know that poor posture, such as slouching or craning the neck forward, can lead to musculoskeletal disorders (e.g., carpal tunnel syndrome, back pain).
Good posture can be helped by ergonomic considerations on the chair, monitor positioning, keyboard placement, etc. Proper posture promotes better circulation, and can help prevent issues like swollen legs or deep vein thrombosis (DVT).
Topics that need to be considered are monitor position, keyboard and mouse placement, chair height and back support.
Equally important are frequent breaks to stand up, stretch, and change positions (a least every 30 minutes to avoid stiffness).
Good posture certainly means having the laptop or monitor at eye level, and placed at about arms length from the head. The top of the screen should be at or slightly below eye level. The top third of the screen should be at eye-level. Ideally the screen should sit within a 30-degree viewing angle, sitting or standing, and there should be no need to bend down to view the screen.
Good posture also means the forearms and wrists should rest at around a 90-degree angle to the elbows, and certainly not above the level of the elbows. There should be minimal bend at the wrists.
The chair height should ensure that the knees are at the level of the hips, and the feet flat on the floor. The armrests should be positioned so that arms sit gently on the armrests with the elbows close to the body and shoulders relaxed.
The Adjustable Height Desk
This brings us to the adjustable height desk. There are desks where the height can be adjusted manually, but here we are looking at desks where the height can be adjusted electrically.
The key points:-
- The surface area and durability of surface.
- The difference between a single-motor and a dual-motor (which will affect the weight capacity and lifting power).
- A sturdy and stable structure (particular in the ‘high’ position) that can withstand loads commonly found in workspace.
- Ease of operation, with effortless height adjustment, and with a memory function for some commonly used positions.
Buying an Electrically Adjustable Desk
This is perhaps not the most conventual option for a desk, but it’s not rocket science. So I was amazed to find on Amazon hundreds of options, ranging in price from around €90 up to the totally bonkers €13,000.
In theory it’s was important to pick a desk with strong motor(s), good weight capacity, and quiet operation. Customer reviews on reliability and the warranties offered were important. It was also important that the company has a decent presence in Europe.
Other issues worth considering included where the desk commands were located, the materials used (in particular for the table surface), and the options available (e.g. monitor support, cable trays, desk drawers, USB and charging points, etc.).
Scanning through the recommendations, and looking only at the reasonably priced options, and those scoring 4-stars or better, there were three points that worried me (in addition to the price). Firstly, just how stable were these desks at their maximum height? Secondly, what was the desk surface like? Thirdly, what were the commands like?
Frankly, I’m still old-school, and I like to touch things I buy. In particular when “venturing into the unknown”, and I don’t know the brands, etc. In a local department store they actually had three options in stock.
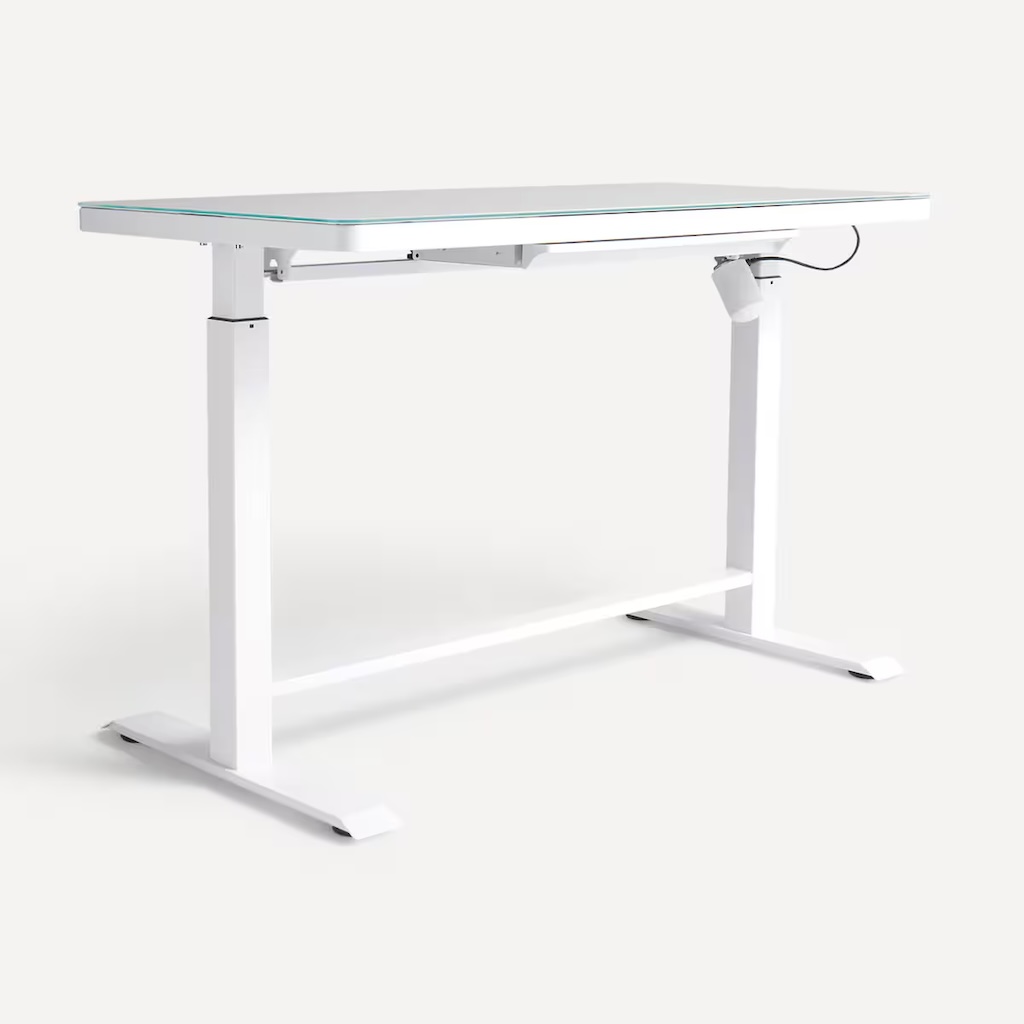
The model LIFT (seen above) stood out for the following reasons:-
- Surface 120×60 cm
- Height adjustable between 74-122 cm
- Solid lacquered steel structure, with T-style legs
- 8 mm thick tempered glass surface
- Dynamic load limit of 60 kg, and static load limit of 80 kg
- Touch control screen integrated into the glass surface
- Height indicator, and two preset heights (includes a locking function)
- Two USB ports
- Available immediately, including service for assembly
- Competitively priced
- Proven guarantee and replacement policy.
- Some desks had a lifting capacity >100 kg
- Some desks had duel motors, and are sold as ‘smooth and quiet action’
- Some desks had a good size integrated cable tray, and cable passthrough holes
- Some desks had mounting points for first-party accessories like surge protectors and a keyboard tray
- Some desks also had an integrated wireless charger
- Some desks had an anti-collision system to stops the desk hitting something underneath it
- Some desks had a reminder to ‘sit and stand’ sent direct to a smartphone
- Some desks offered a 15-year warranty (but the less expensive tables only offered 5 years).
My Desk, Delivered and Assembled
True to their word, my electrically adjustable desk was delivered 3-working days later. The department store used a delivery company, and for a price, they would also unpack, assemble, and remove the waste. What was interesting was that I had purchased 4 different items, including the desk and a chair, and the department store had a very competitive, forfeit full installation price of €70, irrespective of the number of items to assemble.
The two men had already assembled numerous examples of the desk (and chair), and knew exactly what-went-where. The instructions were very good, but two points are worth noting. Firstly, assembly was limited to just a few pre-assembled parts (top, legs, feet), and two sets of eight bolts, all using the same 5mm hex key (provided). It would have taken me about one hour to unpack and assemble the desk, but it took them less than 10 minutes with their cordless screwdriver. Secondly, the desk has a tempered glass top and is surprisingly heavy, thus very difficult to manhandle safely, particularly for someone working alone.
Having someone unpack and assemble the desk meant that they tested it, etc., and any problems could be dealt with immediately. They told me they occasionally had some problems with the chair (which was surprisingly difficult to assemble), and if needed they had a spare in the van.
First impressions
Very positive. As expected, the build quality was excellent, it was very solid and stable (also raised to the maximum height), and the tempered glass top looked great as well. The vast majority of this type of desk don’t have a bracing strut at the level of the feet, and this may be important for its overall stability.
Negatives. Some manufacturers have managed to hide the motor within the desk frame, but here it is quite evident and not particularly elegant. Secondly the touch controls are embedded on the right in the glass top. This means the control unit is also fixed inside the frame, on the right-hand side. Which means the mains cable is also fixed. Some other models allow a separate command unit, control unit, and main cable to be fitted to the right or left. In my case the mains wall socket is also on the right, but had it been on the left, it would have not looked very elegant.
This brings up the issue of cables. This desk has a small integrated draw for office accessories. It’s not very deep, but it’s still useful. However, many desk manufacturers also provide a series of accessories, such as cable trays. Unfortunately, this is not the case with this desk. In addition, it does not have a wood-type top into which cable trays could be screwed.
One important point was that the space available was about 155 cm wide, and possible 60-70 cm, or even 80 cm, deep. I decided to go with a desk size of 120×60 cm, for two reasons. Firstly, it was what I could see and touch in the department store, and secondly it is the only size available with a glass top and integrated touch-commands. But in fact, it occupies the space available very elegantly. I think a larger desk would have, perhaps, looked out-of-place, and less elegant.
Learning About the Desk
The reality was that although the desk was in the department store, the sales staff knew little or nothing about how it worked. They showed me how it went up and down, and told me it could be programmed for some pre-selected heights.
However, the assembly instructions also included how to use the touch controls. And surprise, surprise, it also included something called ‘device communication’ with a ‘sit stand desk’ app (the logo corresponds to the app ‘SitStand Desk’).
The touch commands allow the desk to be ‘unlocked’ and go up and down, with a height (in cm) indicated in a display. There are two programmable memory keys, for sitting and standing. The system can be re-initialised, and has a series of error codes. The desk will stop if it encounters resistance.
There is an ‘advanced’ setting where maximum (>97cm) and minimum heights (<96cm) can be pre-programmed.
The final point was about not using cleaning agents, polishes or abrasives on the glass top, but to just wipe with a dry cloth, or soft moist cloth with tap water.
Two Problems with the Desk
Two problems, one important, the other much less so.
The important problem emerged when trying to clear my desktop of cables. I mentioned that my desk did not come with accessories, so no cable tray.
There are two main options, screwing a third-party cable tray into the underside of the desktop, or various ‘non-drilling’ alternatives.
My desk consists of a hollow steel frame and an integrated glass top. It might have been possible during the unpacking of the desktop to drill holes in the steel frame, but once installed it would have been very difficult, and the narrowness of the steel frame would, I think, have made it a non-optimal solution.
The ‘non-drill’ options use either clamps or some form of double-sided adhesive tape. The clamps posed a problem because of the thickness of the frame and glass desk top (>4cm). The adhesive tape option did not work because of the narrowness of the steal frame, and limited access to the underside of the glass top.
The solution was a “Cable Management Box“, a kind of storage box for cables with a nice bamboo lid.
Word of warning – Many of the cable trays show some cables and a power strip, and just mention power bricks. But the number and weight of the power bricks is, in my opinion, the most important thing. Before deciding on what to do I ‘cabled out’ my desktop just to see what needed to be ‘housed’ in any cable tray, etc.
The second ‘minor problem’ was that I bought a 90×40 cm mouse pad. The positive is that it covers and protects a large portion of the glass desk top. However the ‘negative’ is that monitor support legs are partially sitting on the mat. I should have thought of this, but I’m not sure what the alternative might have been.
The Chair
In my opinion the next most important thing is the chair. I had spent years sitting in a variety of chairs, both in the office and at home, and none were really comfortable (although many were acceptable).
No matter how we analyse which chair supports the best posture, it all comes down to trying out a few different models.
The desk was in the department store and they also had at least 20 different desk chairs available to try out.
Prices ranged from €89.99 to €1,995, so the choice was substantial in build quality, form, textile/leather, etc.
I eliminated gaming seats, leather seats, those with limited padding and no/poor armrests, those with no padding on the back, etc.
I was incapable of appreciating the difference in comfort and function between the cheapest and most expensive. What I found was that my subjective sense of comfort (for a very limited test period) was almost independent of price.
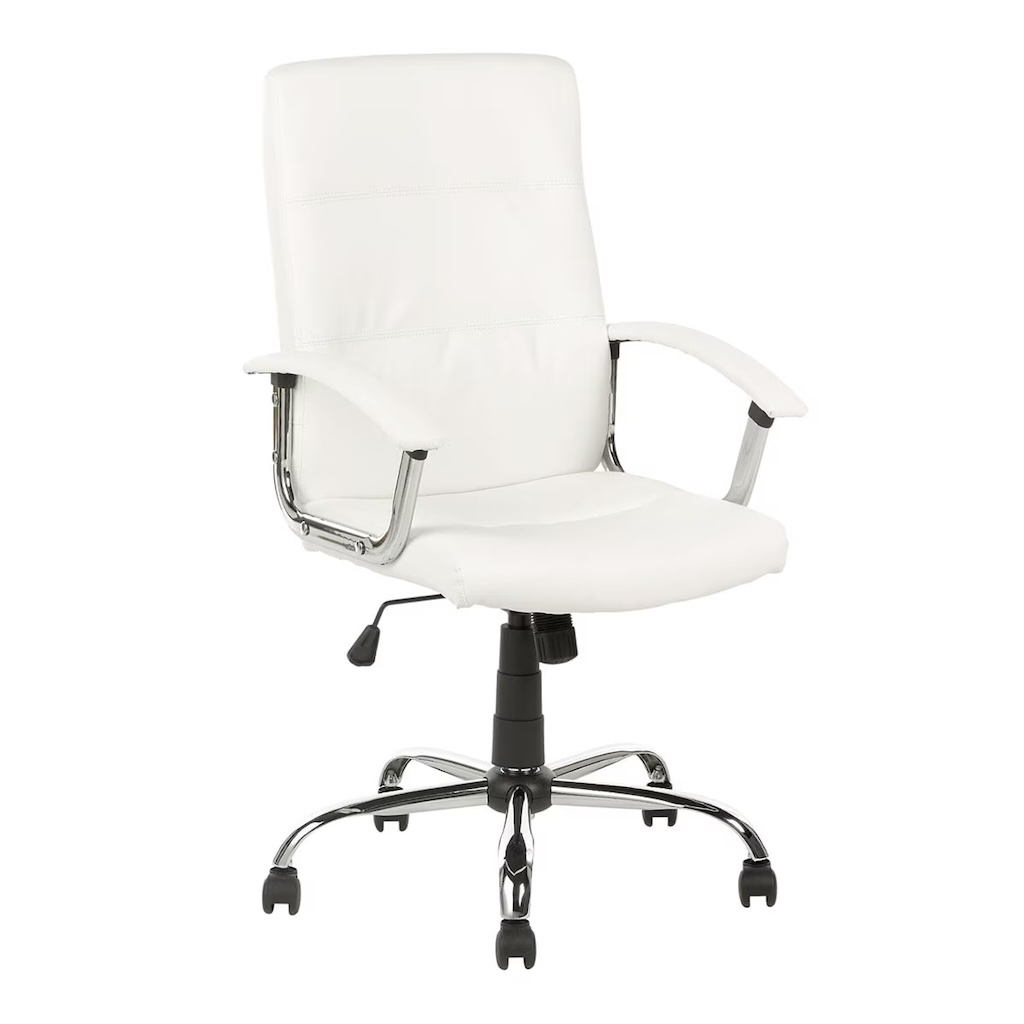
Some commentators swear by one or other model, yet others suggest going for something not be too… comfortable. I tried out the one shown above (model TEA), it felt comfortable, and it cost €125, so I bought it.
I liked the fact that it was reclining and had a tension regulator, and that it complied with EN-1335 (European Standard for Office Chairs), which indicated that it was for professional use and was recommended for intensive use for more than 8 hours.
Like the desk, this chair came in pieces, and was expertly assembled in about 5 minutes. But they did have a few problems, and I certain would have had more problems. The seat and back are held together by two armrests. Finding the holes, aligning them, and then screwing the lot together took both men, and their cordless screwdriver, some expertise and effort. Alone with a hex key might have been quite a challenge.
The only way to really judge if I made a good choice is to wait a few week/months, and then decide.
First impressions
The wheels did not appear to roll easily. However, they did when I was sitting in the chair. Otherwise comfortable.
Later I continued to find the seat comfortable, and the armrests were comfortable and well positioned. The problem was the roller wheels, they were not strong and smooth enough.
Also the height adjustment was fine, but I would have liked an extended range of heights. I use it in its highest position.
Overall impression
I’m not sure I made the best choice. The chair is comfortable, but the build quality is perhaps not perfect. We will decide in a couple of months what to do!
How to Use the Chair Properly?
I know this sounds stupid, but ergonomics tells us how we should sit in an office chair. And, of course, most of the time we don’t have the right posture.
Whilst I’m not totally happy about the chair I purchased, it does deliver in terms of sitting position.
The joints of my hips, knees, and ankles at an angle of around 90°, with my knee joints just below the hip joints, ankle joints in front of the knees, feet flat on the floor, and a gap of four fingers between the back of my knee joint and the front edge of the seat (recommended three fingers).
My upper body is reasonably upright and not twisted. Lumbar support of the back rest could be better. My head is not particularly well aligned with my spine, and there is no support for my upper back. My upper arms maybe just a touch too forward, but my elbows are at an angle around 90°, and close to my body. I do tend to drop my shoulders a little, which is not good. My wrists are reasonably straight and aligned with the forearms.
This chair was not expensive, and provides a reasonably good posture.
For the future – If I wanted to buy a better chair, I would look carefully at the rollers, ask for a greater variation in height settings, and focus on support also for my upper back (better shoulder posture).
My impression is that I am sitting on the chair, rather than in it. Perhaps this is a key thought if I decided to look for a better desk chair in the future.
In addition, I did buy a 120×90 cm transparent chair mat designed for hard floors such as marble. The mat was non-slip, non-reflective, and also reduced the noise made when moving around.
The Monitor
A monitor is just a specific type of display destined to be connected to a computer. In the early days I remember questioning the need for a monitor, but today I find the larger screen much easier on the eyes and neck, and perfect for arranging my screen clutter (no matter how organised I am, my screen real estate always looks a bit cluttered).
Wanting a good monitor does not mean spending in excess of €5,000 on Apple’s Pro XDR 6K display. Even their Studio Display is just too expensive for what is offered, and you have to pay extra for the stand.
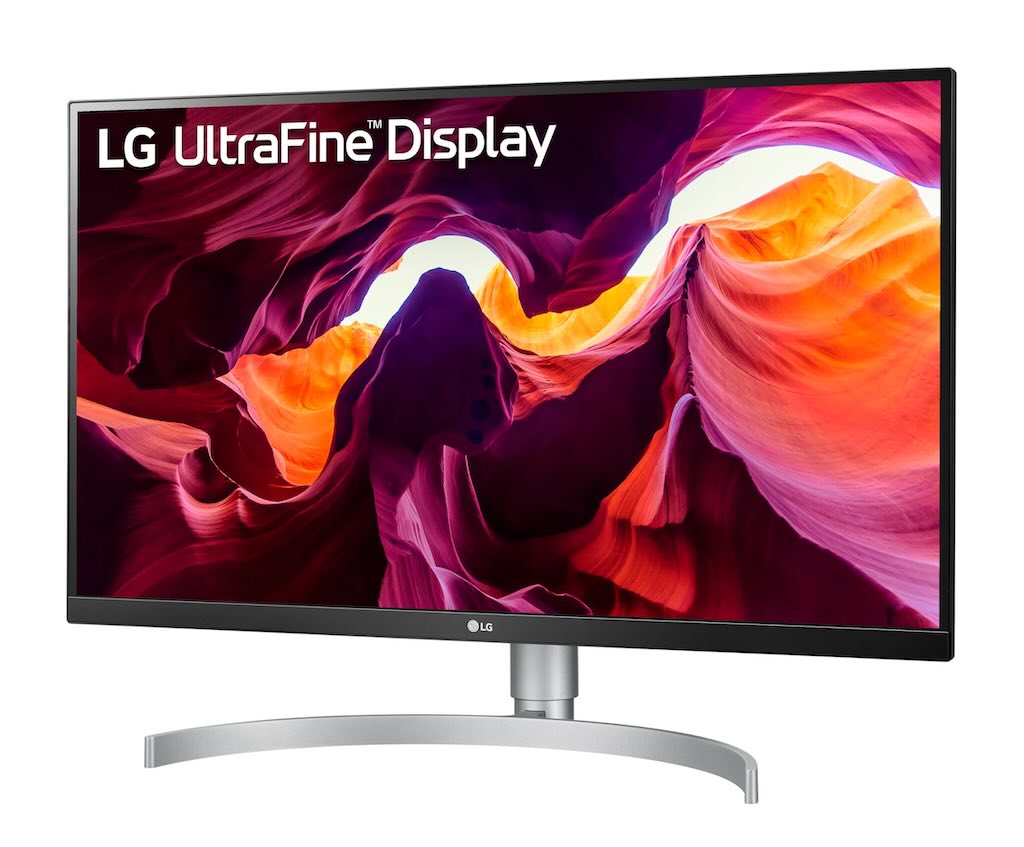
In the home desktop setup I’m describing here, I continued with the monitor I already was using, an LG 37UL850-W, a 16:9 IPS LED, with a maximum resolution of 3840 x 2160.
This monitor was first released in early 2019, and was considered state-of-the-art at the time.
Still today (early 2025) it’s a great monitor for office-style work. Remembering I don’t play video games, nor do I spend time editing videos. Do I really need HDR10+ or ‘true HDR‘? No, so I kept my ‘old’ monitor.
CalDigit TS4
It’s difficult to decide what is the next most important item for my new desktop setup, e.g. is it the keyboard, the docking station, or perhaps the laptop itself?
So let’s look at the docking station, the CalDigit TS4 (Thunderbolt Station 4). This is a new bit of my setup, and I hope, along with a wireless keyboard and mouse, will remove most of the cables from desktop.
Connecting my M3 MacBook Pro to the TS4
I followed scrupulously the instructions to connect the TS4 to my MBP, using the cable provided by CalDigit, but the LED did not light-up on the CalDigit. I disconnected everything, waited a few minutes, and tried again, using both different wall sockets and different Thunderbolt ports on my laptop, but the LED still did not light-up. I checked the power socket and the output from the CalDigit power-brick. And in reconnecting the T4 to my laptop, finally the LED lit-up. What was the problem? Who knows, but I was happy that it finally worked.
Connecting a LG monitor to the TS4
It is my understanding that the LG 37UL850-W requires 60W on the USB-C Power Delivery (PD), whereas the TS4 can deliver only up to 15W over USB-C. The monitor might not have worked properly, so I kept its own power supply.
I did have an issue with connecting my laptop through the TS4 to the monitor. I tried all the different USB-C I had, and none worked. So initially I reconnected the laptop to the screen using a HDMI cable, and ordered a full Thunderbolt cable. This proved to work perfectly, and now my laptop is connected to the TS4 with the cable provided with the TS4, and the TS4 is connected to my monitor with the new Thunderbolt cable.
Connecting a Samsung SSD T9 to the TS4
No problem with a USB-C to USB-C cable.
Connecting a LED monitor lamp to the TS4
Another convenience of the TS4 was that I could connect a LED monitor lamp to one of its USB ports.
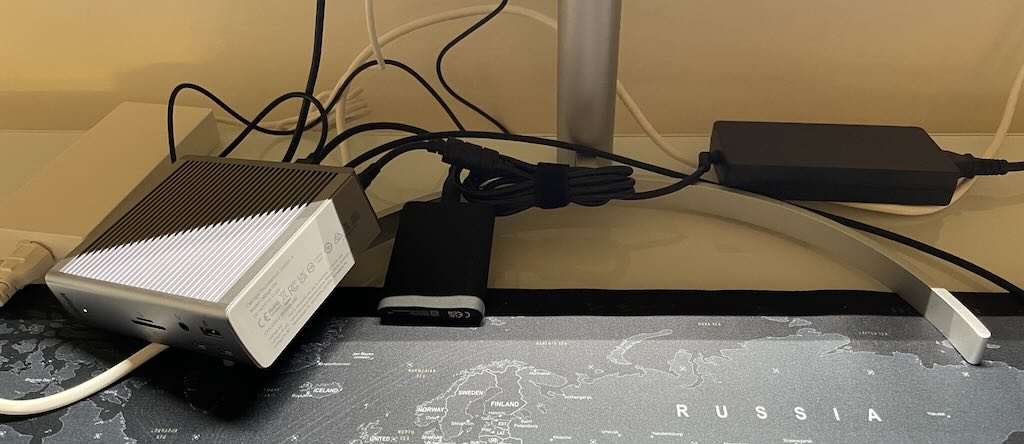
My first setup (see above) shows the TS4, the Samsung SSD T9, and the power-bricks for the TS4 and the LG monitor. The cabling was ad-hoc, using some very short USB-C cables, but shows what cables and power bricks need to be hidden. It’s important to note that I’ve already ‘lost’ the charger for the laptop, and the HDMI cable to the monitor.
Connecting the Wireless Keyboard and Mouse
The next step was to connect the wireless keyboard and mouse. This proved incredibly easy.
The Magic Keyboard needs to charge occasionally by connecting with a Lightning cable (provided). The charge state can be seen in the Bluetooth option in System Settings, but macOS will notify me when the battery drop below 20%. I can still use the keyboard while charging.
I took the keyboard with the separate numerical keypad on the right. For some reason this does mean that my keyboard is positioned to the right of the screen. The disposition of the keys, etc. are different from the laptop and it took me a while to adapt. I’m not a touch typist, but I do type without looking at the keys. So the exact position of the keyboard is critical. The frame of the laptop provides a frame and the position, whereas I still make some mistakes if the Magic Keyboard is not exactly centred to my sitting position, which itself is centred on the monitor.
Otherwise, I’m very happy the keyboard.
I selected a Logitech Lift (a ‘vertical’ mouse), in a left-handed version. It worked first time, but its taking some time to adjust to the different position of the commands.
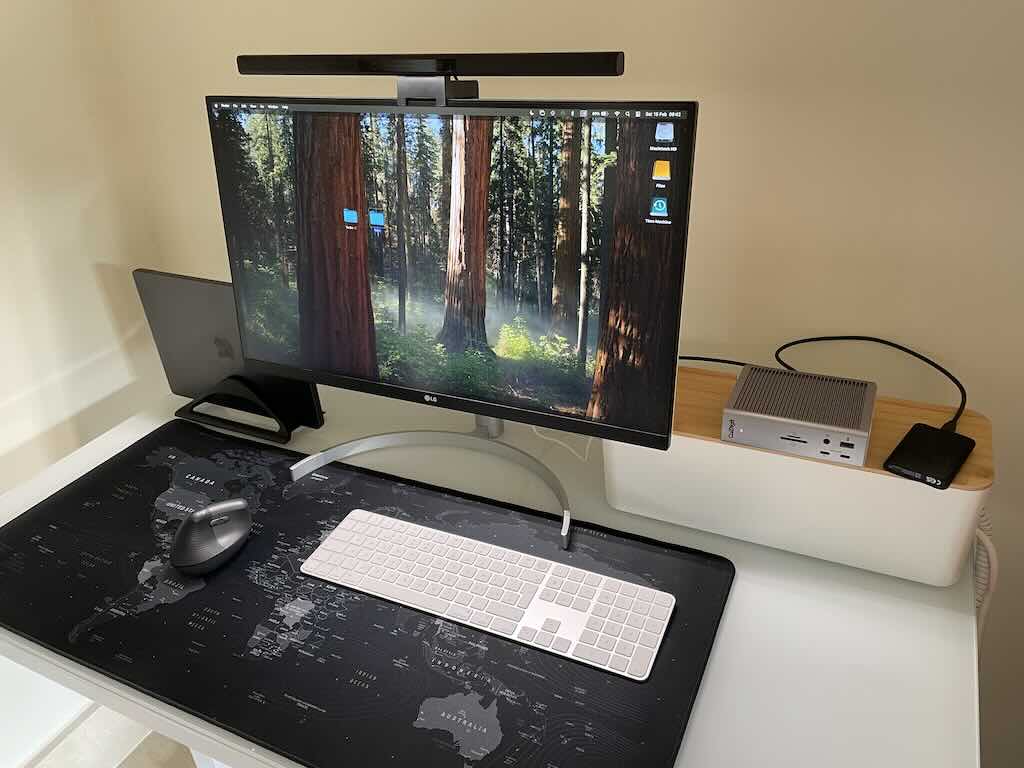
My final setup (seen above) has a power strip and the power-bricks of the TS4 and LF monitor in a “Cable Management Box“, a kind of storage box for cables with a nice bamboo lid. Also my laptop is now placed in clamshell mode in a vertical laptop stand.
One Irritant
When not using the laptop, it’s best to shut it down.
Leaving the laptop in “sleep mode” means that it’s easy to wake it up, and find all the apps, windows, and running processes ready, and in addition background processes, e.g. downloads, updates, and Time Machine backups, will still run.
But there is a risk that the laptop could be woken up by an attacker, and even with FileVault enabled, the disk is still decrypted while powered on. It’s possible to lock the screen with ‘⌘ + Control + Q’, but keep active the current session and any running apps or background tasks. Wake up will need the password or Touch ID (if enabled) to unlock it.
The problem with shutting-down the laptop when in clamshell mode is that you can’t re-start the laptop without opening it. When shutdown the CalDigital TS4 shuts down as well, and will only wake-up when the laptop re-starts. And it will not re-start from the keyboard or mouse because Bluetooth does not work when the laptop is shut-down.
To use the Magic Keyboard to re-start the laptop it has to be connected with its USB-C cable to either laptop or through the TS4, before being shut down. This ensures the keyboard remains powered and can re-start the Mac.
It must be remembered that the keyboard needs to be occasionally connected, in order the charge.
So the only sensible option is to briefly open the laptop and press the power button, then close it once it starts booting. Having gone to the all the trouble to clear the desktop of cables and the open laptop, this is just a bit irritating.